

Sep 2026 How to Restore Heritage Timber Windows: A Step-by-Step Guide
Table of Contents
- When to Replace vs Restore Timber Windows
- Assessing the Condition of Your Heritage Timber Windows
- How to Remove Lead Paint from Timber Windows Safely
- Essential Timber Window Restoration Tools and Materials
- Step-by-Step Restoration Process for Heritage Timber Windows
- Maintaining Heritage Timber Windows After Restoration
- Regulatory and Heritage Council Compliance
- Frequently Asked Questions
Last Updated: September 22, 2026
When to Replace vs Restore Timber Windows
Deciding whether to restore heritage timber windows or replace them outright is one of the most consequential choices you’ll make during a renovation. The answer depends on several practical factors: the structural integrity of the frame, the extent of timber decay, your budget, and whether your property is heritage-listed.
Timber windows that are structurally sound but cosmetically worn are almost always worth restoring. The joinery, the weight and pulley system, and the glazing putty are often original features that cannot be easily replicated. Restoration preserves these period features while improving thermal efficiency through draught proofing and modern glazing techniques. If the timber frame shows only surface-level damage, flaky paint, minor wood rot, or deteriorated putty, restoration is the right move.
However, replacement becomes necessary when the structural integrity is compromised. Severe wood rot that penetrates deep into the frame, broken sash cords, or damage to the casement window structure itself may make restoration economically or technically unfeasible. A professional assessment will reveal whether the timber can be salvaged or whether replacement is the only option.
The real distinction isn’t cost alone, it’s whether the timber frame can be saved. Cosmetic damage almost always favours restoration. Structural failure favours replacement.
Assessing the Condition of Your Heritage Timber Windows
Before committing to restoration, you need a clear picture of what you’re working with. A thorough assessment identifies which windows can be restored and which sections of timber require targeted repair.
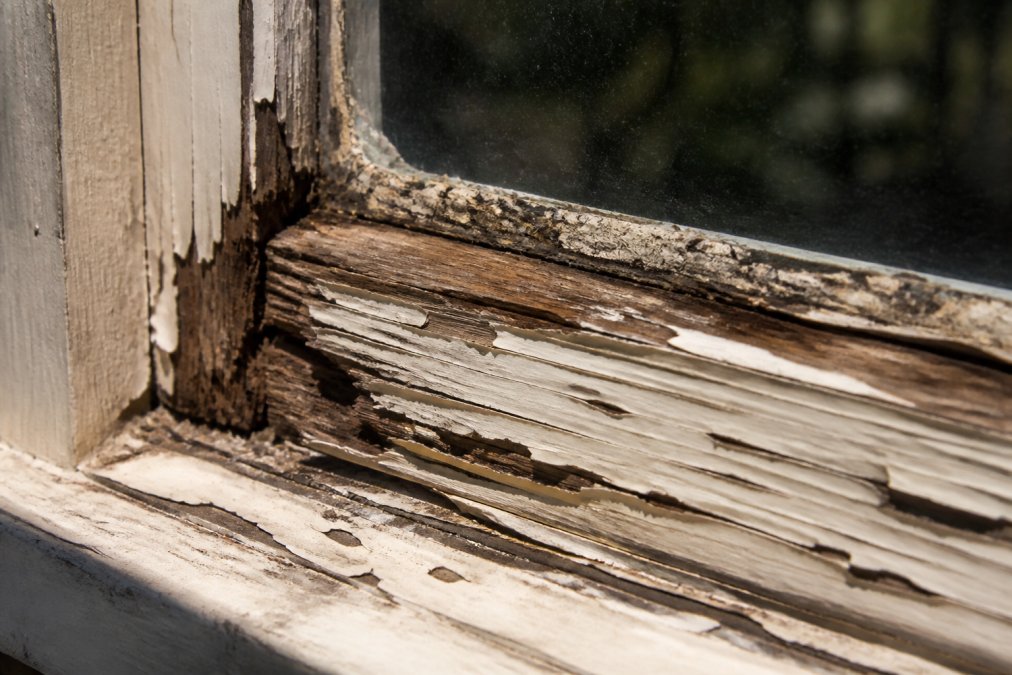
Identifying timber decay and wood rot
Timber decay and wood rot are the primary reasons heritage timber windows fail. Both stem from moisture penetration, but they progress differently and require different treatment approaches.
Wood rot develops when moisture content in the timber exceeds 20 per cent for extended periods. Fungal growth accelerates the decay, breaking down the wood’s cellular structure. Early-stage rot appears as discoloured timber, often darker or lighter than the surrounding wood. As it progresses, the timber becomes soft and spongy, a screwdriver or probe will sink into it easily.
Look for these visual indicators:
- Paint bubbling or peeling (often the first sign of moisture problems)
- Timber that feels soft or crumbly when probed
- Dark staining or discolouration around joints
- Visible fungal growth or mould
- Gaps between the timber frame and the glazing putty
The severity matters. Surface rot confined to the outer 5-10 millimetres can be removed and treated with wood filler or epoxy resin repair. Rot that penetrates deeper into the frame suggests the structural integrity is compromised, and replacement may be necessary.
Checking structural integrity and moisture content
Structural integrity determines whether restoration is viable. A window frame that no longer holds its shape, that rocks in its opening, or where the sash no longer operates smoothly has suffered significant deterioration.
Test the structural integrity by gently pushing on different sections of the frame. Movement that goes beyond minor flexing indicates loose joinery or rotted timber. Check whether the sash window moves smoothly in its tracks, sticking or grinding suggests swelling from moisture or debris accumulation.
Moisture content is the root cause of most timber window problems. You can measure it with a moisture meter (typically available for hire or purchase from hardware stores). Readings above 18-20 per cent indicate active moisture problems. This is where you’ll find active wood rot and where draught proofing and weather stripping will make the most difference during restoration.
Check these vulnerable zones:
- The sill (bottom of the frame) where water pools
- Joints where the timber frame connects (where moisture gets trapped)
- Areas where the glazing putty has failed
- The junction between the frame and the surrounding wall
How to Remove Lead Paint from Timber Windows Safely
Heritage timber windows often carry multiple layers of paint, and older coatings frequently contain lead. Lead paint removal requires specific precautions to protect your health and comply with safety standards.
Lead paint poses a genuine health risk, particularly during sanding or scraping. When disturbed, lead particles become airborne and are easily inhaled. The risk is highest for children and pregnant people. If your windows were painted before the 1980s, assume lead is present unless testing proves otherwise.
Safe removal involves three key steps: containment, careful removal, and proper disposal. Seal off the work area with plastic sheeting to prevent dust spread. Wear a P2 or P3 respirator (not a cloth mask) during any work that creates dust. Wet the surface before scraping to minimise airborne particles. Never sand lead paint dry.
For professional guidance on lead paint removal and disposal requirements, consult the Australian Government’s lead paint safety information.
Never dry-sand lead paint. Always wet the surface first and wear a proper respirator. Improper lead removal exposes you and your family to neurological damage, particularly in children. If you’re uncertain, hire a professional.
Essential Timber Window Restoration Tools and Materials
Restoring heritage timber windows demands specific tools and materials. The right equipment makes the difference between a professional finish and visible mistakes.
For paint and putty removal:
- Putty knife or glazing chisel (2-3 different widths)
- Carbide scraper for stubborn paint
- Soft brass brush (won’t damage timber)
- Chemical paint stripper (if you choose this method over scraping)
For timber repair:
- Wood filler or epoxy resin repair compound (for small rot areas)
- Wood preservative (water-based, for treating exposed timber)
- Sandpaper (80, 120, 180, and 220 grit)
- Orbital sander or sanding block
- Chisel set for joinery work
For glazing and finishing:
- Glazing putty (traditional linseed oil putty, not modern acrylic)
- Glazing compound tool or putty knife
- Primer (oil-based for timber)
- Undercoat paint
- Topcoat paint (exterior-grade, breathable finish)
- Paintbrushes (quality bristle, 25mm and 40mm widths)
For draught proofing:
- Weather stripping (felt or silicone, depending on window type)
- Draught excluder tape
Step-by-Step Restoration Process for Heritage Timber Windows
This is where the work happens. A methodical approach prevents mistakes and ensures a finish that lasts.
Removing old putty and flaky paint
Begin by removing the old glazing putty carefully. Use a putty knife at a shallow angle, working gradually around the perimeter of each pane. Aggressive scraping risks damaging the timber or the glass. If the putty is particularly stubborn, a heat gun (set to low-medium temperature) softens it and makes removal easier.
Repairing joinery and timber frame damage
Joinery, the traditional method of connecting timber pieces, is what gives heritage windows their strength and character. When joints loosen or timber around them rots, the window loses its structural integrity.
Sanding and surface preparation
Proper sanding creates the foundation for a finish that lasts. Begin with 80-grit sandpaper to remove paint residue and surface irregularities. Progress through 120, 180, and finally 220 grit for a smooth finish. Sand with the grain, never against it.
Glazing and applying new putty
Replace the glass only if it’s broken or you’re upgrading to improved thermal performance. If the glass is original and intact, keep it, it’s part of the window’s heritage value.
Priming, undercoat, and topcoat application
Prime the bare timber with oil-based primer. This seals the wood and prevents the topcoat from being absorbed unevenly. Allow the primer to dry fully (typically 24 hours).
Maintaining Heritage Timber Windows After Restoration
Restoration is not a one-time event. Heritage timber windows require ongoing maintenance to prevent the problems that necessitated restoration in the first place.
Annual maintenance should include:
- Inspecting the glazing putty for cracks or deterioration
- Checking paint for chips or peeling (particularly on the sill)
- Cleaning the window tracks and removing debris
- Testing the weather stripping and draught proofing for wear
- Wiping down the frame to remove dirt and moisture
Regulatory and Heritage Council Compliance
Contact your local heritage authority before purchasing materials or beginning work. A 10-minute conversation can prevent costly mistakes and rework. Many councils provide free advice on appropriate restoration methods for heritage properties.
The Colour Palette has worked extensively with heritage properties, and our team understands the specific requirements for heritage-listed buildings. We’re experienced in sourcing appropriate materials and coordinating with heritage councils to ensure restoration meets both aesthetic and regulatory standards.
Frequently Asked Questions
Is it worth restoring old timber windows instead of replacing them?
Restoring heritage timber windows preserves period features and architectural character that cannot be replicated with modern replacements. Original sash windows, casement windows, and traditional joinery represent significant heritage value. Restoration is typically more cost-effective than replacement, maintains thermal efficiency when properly glazed and weather-stripped, and often satisfies heritage-listed property requirements. Replacement is only necessary if timber decay is structural or moisture content testing reveals irreversible damage beyond repair.
How do you safely remove lead paint from old timber windows?
Lead paint removal requires containment to prevent dust inhalation and contamination. Wet sanding with a HEPA filter-equipped sander is safer than dry sanding. Alternatively, chemical strippers designed for lead paint removal can soften the paint for careful scraping. Wear a fitted respirator, gloves, and protective clothing throughout. Dispose of lead-contaminated materials according to local waste regulations. For heritage-listed properties, consult your state’s Heritage Council before beginning work, as some restoration methods may require approval.
What tools do you need for DIY timber window restoration?
Essential timber window restoration tools include a paint scraper or putty knife, sanding block and sandpaper (120-220 grit), chisel for removing old putty, wood filler and epoxy resin repair compound for joinery damage, glazing putty, a putty knife, priming and topcoat brushes, and a moisture meter to check timber condition. For lead paint removal, a HEPA-filtered sander or chemical stripper is necessary. Professional-grade work may require additional tools such as a heat gun, wood preservative applicator, and weather stripping installation equipment. Consider hiring professionals for complex joinery repairs or heritage-listed properties.
How often should heritage timber windows be maintained after restoration?
Establish a maintenance schedule of twice yearly: inspect glazing putty for cracks, check weather stripping and draught proofing seals, and look for signs of moisture or wood rot. Clean window tracks and apply wood preservative as needed. Repaint topcoat every 5-7 years depending on exposure and climate. Inspect sash weight and pulley systems annually for smooth operation. Regular maintenance prevents moisture ingress, extends the life of restoration work, and preserves thermal efficiency. Document all maintenance to support heritage-listed property compliance and future restoration planning.