

Sep 2026 How to Protect Furniture During Painting
Table of Contents
- Why Protecting Furniture Matters Before You Paint
- Best Drop Cloths for Painting: Canvas vs. Plastic
- Painting Preparation Checklist: Room Setup and Furniture Coverage
- How to Move Heavy Furniture for Painting Projects
- Step-by-Step Furniture Protection Process
- Furniture-Specific Protection Techniques
- Safety Precautions and Ventilation During Interior Painting
- Eco-Friendly Disposal and Reuse of Protective Materials
- Frequently Asked Questions
Last Updated: September 18, 2026
Why Protecting Furniture Matters Before You Paint
Paint splatters and drips happen. The difference between a polished renovation and a stressful cleanup comes down to knowing how to protect furniture during painting before the first brush stroke.
Skipping furniture protection risks permanent damage to finishes, allows fumes to seep through gaps, and creates tripping hazards. Inadequate preparation can turn straightforward jobs into weeks of cleanup and restoration.
The real cost is time spent scraping paint off furniture and managing damage after painters leave. Getting protection right from the start lets you enjoy your newly painted rooms instead of managing problems.
This guide covers the exact methods professionals use to keep your space clean and your belongings safe during interior painting projects.
Best Drop Cloths for Painting: Canvas vs. Plastic
The material you choose for floor and furniture protection shapes everything that follows. Canvas and plastic sheeting each have distinct advantages and limitations.
Canvas Drop Cloths
Canvas drop cloths are absorbent, durable, and reusable. They trap paint drips instead of letting them slide across your floor, making them ideal for hardwood and tile surfaces where you need grip and stability.
Canvas breathes so moisture doesn’t pool, grips shoes to reduce slip hazards, and handles foot traffic without bunching, critical when moving between rooms.
Canvas absorbs paint, becomes heavy when saturated, and takes up storage space.
For furniture protection specifically, canvas works well as a primary cover because it won’t release paint fumes the way plastic does, and it stays in place during movement.
Plastic Sheeting and Polyethylene
Plastic sheeting creates a moisture barrier and is lightweight and affordable, making cleanup simple.
Plastic slides easily, allowing quick repositioning but also shifting during work. Paint drips can pool and spread if the sheet isn’t perfectly flat.
Plastic traps fumes underneath and tears easily under foot traffic.
For furniture protection, plastic works best as a secondary layer, use it under canvas, or combine it with painter’s tape to prevent adhesive residue on delicate surfaces.
Painting Preparation Checklist: Room Setup and Furniture Coverage
Proper preparation takes time but prevents disaster. This checklist ensures nothing gets missed.
Pre-painting Room Inspection
Walk through the space and identify items to protect: wall hangings, shelves, decorative objects, plants, books. Decide which furniture stays and which moves out.
Test light fixtures and check vents, air returns, and door frames for loose edges that might catch paint.
Assess flooring type, hardwood, tile, concrete, or carpet each require different protection layers.
Securing Covers with Masking Tape and Painter’s Tape
Painter’s tape has low-tack adhesive that releases cleanly; masking tape is stronger but can damage finishes if left too long.
Use painter’s tape exclusively on furniture and fixtures. Apply it along edges where drop cloths meet walls, around light fixtures, and where plastic might shift.
Press tape firmly without stretching it. Replace any tape that lifts or curls during painting.
Tape secures canvas and plastic to baseboards to prevent bunching or sliding.
How to Move Heavy Furniture for Painting Projects
Moving large pieces safely prevents injury and damage to walls and floors. Use proper technique.
Remove drawers, shelves, and doors separately to reduce weight and prevent damage.
Use furniture sliders or cardboard under legs to reduce friction and protect flooring.
Clear a path, remove obstacles, and measure doorways and furniture dimensions beforehand.
Never drag furniture across unprotected floors. Use drop cloths underneath and recruit help for pieces over 30 kilograms.
Step-by-Step Furniture Protection Process
This is where theory meets practice. Follow these steps in order.
Step 1: Clear and Assess the Space
Remove all small items: books, decorative objects, plants, throw pillows, artwork. This prevents paint from landing on personal items and gives clear sight lines.
Assess what furniture stays. Large pieces move to the centre; smaller items can be moved out entirely if space allows.
Take a photo of the room layout to make it easier to return furniture to its original position.
Step 2: Move Furniture to the Centre of the Room
Group furniture in the middle to create a perimeter for painter access and concentrate protection under one covering system.
Use furniture sliders and push slowly. Check doorways and corners as you move.
Leave adequate space around centred furniture so painters can access all walls and trim.
Step 3: Cover Furniture with Appropriate Materials
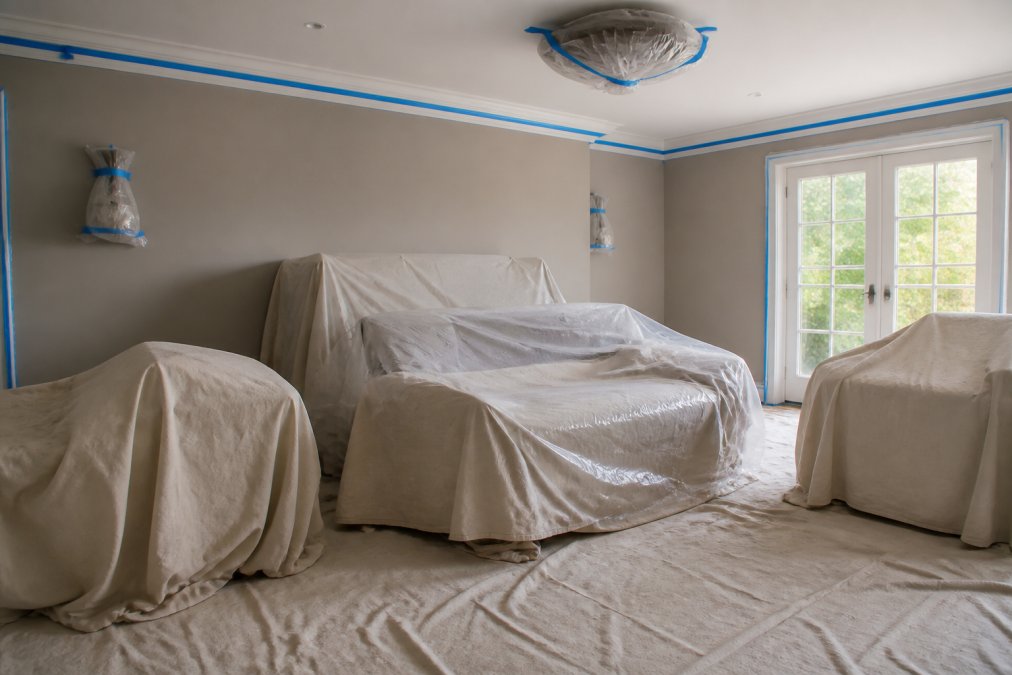
This is where canvas drop cloths shine and show how to protect furniture during painting. Lay canvas over the grouped furniture, allowing it to drape naturally. The fabric should cover everything, tops, sides, and as much of the legs as possible.
For delicate upholstery, add plastic first, then canvas on top to prevent fibres embedding in fabric.
Secure canvas with painter’s tape at the base to prevent shifting. Don’t tape the top so the cloth can move slightly if bumped.
Step 4: Protect Floors and Carpets
Lay canvas drop cloths across the entire floor, overlapping seams by at least 30 centimetres to prevent paint seeping through gaps.
For carpet, add plastic sheeting under canvas to create a moisture barrier and prevent shifting.
Tape down all edges, especially at doorways where foot traffic is heaviest.
For hardwood floors, canvas alone usually suffices. Add plastic sheeting under canvas if using spray equipment.
Step 5: Handle Light Fixtures and Vents
Wrap light fixtures with plastic sheeting secured with painter’s tape to protect them and prevent paint particles from settling inside.
Tape over ceiling vents and air returns completely to prevent paint particles and fumes from entering your ventilation system.
Remove ceiling fans if painting ceilings. If removal isn’t practical, wrap them thoroughly with plastic sheeting.
Step 6: Address Adhesive Residue Prevention
Remove painter’s tape within 24 hours of the final paint coat to prevent adhesive residue.
Use low-tack painter’s tape on sensitive surfaces and test first. Remove residue with a soft cloth and warm water, never scrape or use solvents.
On delicate upholstery or antique furniture, avoid tape. Use canvas or plastic held in place by weight and careful arrangement.
Furniture-Specific Protection Techniques
Different furniture materials need different approaches. Generic protection doesn’t account for these variations.
Protecting Delicate Upholstery
Upholstered furniture is vulnerable to paint particles settling into fabric and absorbing odours.
Use a two-layer system: plastic directly on the piece, then canvas on top. Plastic prevents paint from touching fabric; canvas prevents sliding.
Avoid painter’s tape on upholstery. Tuck canvas edges under cushions or secure them to the floor instead.
For valuable pieces, consider moving them out of the room entirely if storage space allows.
Safeguarding Wood and Veneer Surfaces
Use canvas drop cloths for wood surfaces. Secure with painter’s tape to the floor, never to the wood.
For antique or valuable wood pieces, wrap in plastic first, then canvas. Check for condensation buildup and ensure adequate ventilation.
Veneer is fragile. Use only painter’s tape and remove it within 24 hours of painting completion.
Safety Precautions and Ventilation During Interior Painting
Proper ventilation protects your health and helps paint cure faster.
Open windows and doors for cross-ventilation. Position fans to push fumes out. A window fan is ideal.
Wear a respirator mask if sensitive to fumes or if the space is poorly ventilated.
Keep the room temperature between 15-25 degrees Celsius for optimal curing.
Never seal the room completely during painting. Paint needs to cure and fumes need to escape.
Eco-Friendly Disposal and Reuse of Protective Materials
Canvas drop cloths are reusable indefinitely. Clean and store them flat or rolled.
Plastic sheeting is single-use but recyclable. Check your local recycling program or dispose with regular waste.
Paper-based painter’s tape can be composted; plastic-based tapes go to regular waste.
Paint-soaked canvas shouldn’t be reused. Dispose of it as regular waste or check local waste facility options.
Never dispose of leftover paint down the drain. Contact your local council for hazardous waste disposal options.
Protecting your furniture during painting isn’t complicated, but it does require attention to detail. The difference between a professional result and a stressful cleanup comes down to using the right materials and securing them properly.
Frequently Asked Questions
What’s the best material to cover furniture with when painting?
Canvas drop cloths and plastic sheeting are the two most effective options. Canvas is absorbent, reusable, and won’t slip on floors, making it ideal for most furniture protection. Plastic sheeting offers a moisture barrier and is cost-effective for one-off projects, though it can shift during painting. For delicate upholstery, use canvas or thick plastic with painter’s tape to secure edges and prevent paint splatters and dust settling on surfaces.
Should I move furniture out of the room or cover it when painting?
Moving furniture to the centre of the room and covering it is usually more practical than removing it entirely, especially for heavy pieces. Grouping furniture in the middle allows painters to access walls and trim work efficiently whilst keeping items protected. This approach also prevents adhesive residue from masking tape on floors where furniture was originally positioned. For small spaces or heritage properties, covering in place is often the only feasible option.
How do I prevent paint drips and splatters on covered furniture?
Layer your protection: use drop cloths on the floor beneath and around furniture, secure plastic sheeting or canvas covers with painter’s tape, and ensure all seams are sealed. Keep paint containers away from covered items and maintain proper ventilation to reduce paint fumes and dust. For delicate upholstery, use additional absorbent materials like old sheets or blankets under the primary cover. Check coverage regularly during painting and replace any torn or saturated materials immediately.
What should I do about adhesive residue from masking tape after painting?
Remove painter’s tape whilst the paint is still slightly tacky (typically within 24 hours) to prevent adhesive residue from bonding permanently. Peel tape slowly at a 45-degree angle to avoid damaging paint or furniture finishes. For stubborn residue on wood or delicate surfaces, use a soft cloth with a small amount of paint thinner or adhesive remover, testing first on an inconspicuous area. Store painter’s tape properly and discard once used to prevent reuse, which reduces adhesive effectiveness.